So, you’ve got a sling coming soon. Maybe it’s already on its way, or you’re still making up your mind. Either way, congrats! You’re about to fall for a tiny creature that’s about the size of a pencil eraser.
And the interesting part about slings is that they’re the easiest and also the most stressful stage to care for. Their needs are simple, but because they’re so small, beginners often try to do too much. You might buy extra gear, worry about details that don’t matter yet, and end up making this simple hobby feel overwhelming before your spider even gets there.
Let’s clear things up, there’s not along list of things you’ll need for sling enclosure. Here’s what you really need for your tarantula sling setup, what you don’t, and why, before we get into setting everything up.
1. Tarantula Sling Enclosure Size: Smaller Than You Think
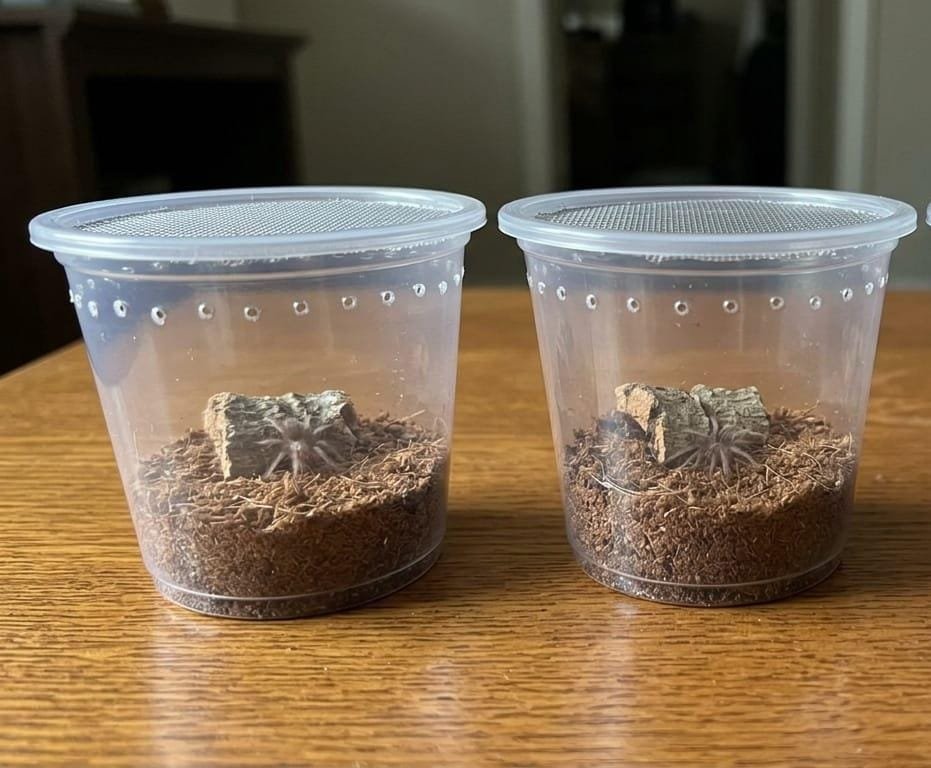
This is where most beginners slip up. You might see fancy, planted setups online and think you need one too. But for a sling, that’s not the best choice.
A sling needs an enclosure that’s small for its size. For most ground-dwelling species, a 2-4 oz (about 60-120 ml) deli cup is perfect. Too much open space doesn’t help; it actually makes it harder for your sling to find food and can cause stress.
For some species, too much space can actually stress them out and make them eat less.
As your sling grows, you’ll move it to bigger enclosures. That’s normal, and it’s part of the fun. Watching the enclosures get bigger is a great way to see your progress together.
What to actually get
- A small, ventilated deli cup or purpose-made sling enclosure
- Ventilation holes small enough that prey insects can’t escape through them (this trips people up more than you’d expect)
2. Best Substrate for your Tarantula Sling Setup
There’s a lot of debate online about sling substrate, but for a sling, simple is best. Use coco fiber or coco coir, keep it moist but not wet, and make it about 1-2 inches (2.5-5 cm) deep so your sling can burrow if it wants.
Some slings like to burrow, while others barely use the substrate. Both are normal. If your sling isn’t digging, don’t worry, it’s just how it behaves, not a sign of trouble.
4. Hides: optional, but kind
A small hide, like half a flowerpot, a piece of cork bark, or even an upside-down bottle cap, gives your sling a place to hide. Not every species will use it, but it’s easy to add and can help new keepers feel more confident.
5. Does your tarantula Sling Setup Change by Species?
Yes, tarantula sling setup does change a bit, and it’s good to know this before you set up your sling’s enclosure. Sling care isn’t exactly the same for every species.
Here’s how you can set up tarantula sling enclosures for a few different species:
- Terrestrial, docile species like *Grammostola pulchripes* are about as forgiving as slings. You can get a simple, flat tarantula sling setup with substrate depth for burrowing. (If you’re keeping this species specifically, our [G. pulchripes sling care guide] goes deeper on humidity and feeding.)
- Fast, defensive ground-dwelling species like *Haplopelma* or *Pterinochilus* need the same basic sling setup, but add a hide close to the substrate right from the start. These slings often dash for cover as soon as you open the enclosure.
- Arboreal species like *Avicularia* or *Caribena* are the main exception. If you use a flat, ground-level setup, they might seem restless or not settle into a web. These species like more vertical space, so give them something vertical, like a piece of cork bark standing up or some fake plants to climb and build webs on.
- Fossorial, or burrowing, species are another exception. If your sling loves to dig, shallow substrate won’t work. You’ll need enough depth to make a real burrow, not just enough to look tidy. You can make a small starter hole to help, but don’t expect it to dig exactly where you want.
If you’re not sure what type your species is, check before you buy your tarantula sling setup. Whether you need height, floor space, or digging depth depends on the species.
6. Water: smaller than you’d assume
For your tarantula sling setup, a shallow water dish, like a bottle cap, works well. For very small slings, just keep one corner of the substrate lightly moist. Since slings are tiny, a deep dish can be a drowning risk instead of being helpful.
7. Tarantula Sling Feeding Equipment and Schedule
This part surprises many beginners, because it’s not about the enclosure. It’s about handling live prey.
- Appropriately sized prey
Use pre-killed or live pinhead crickets, or flightless fruit flies for very small slings. The prey should be no bigger than your sling’s body. Anything bigger could hurt your spider, not just go uneaten.
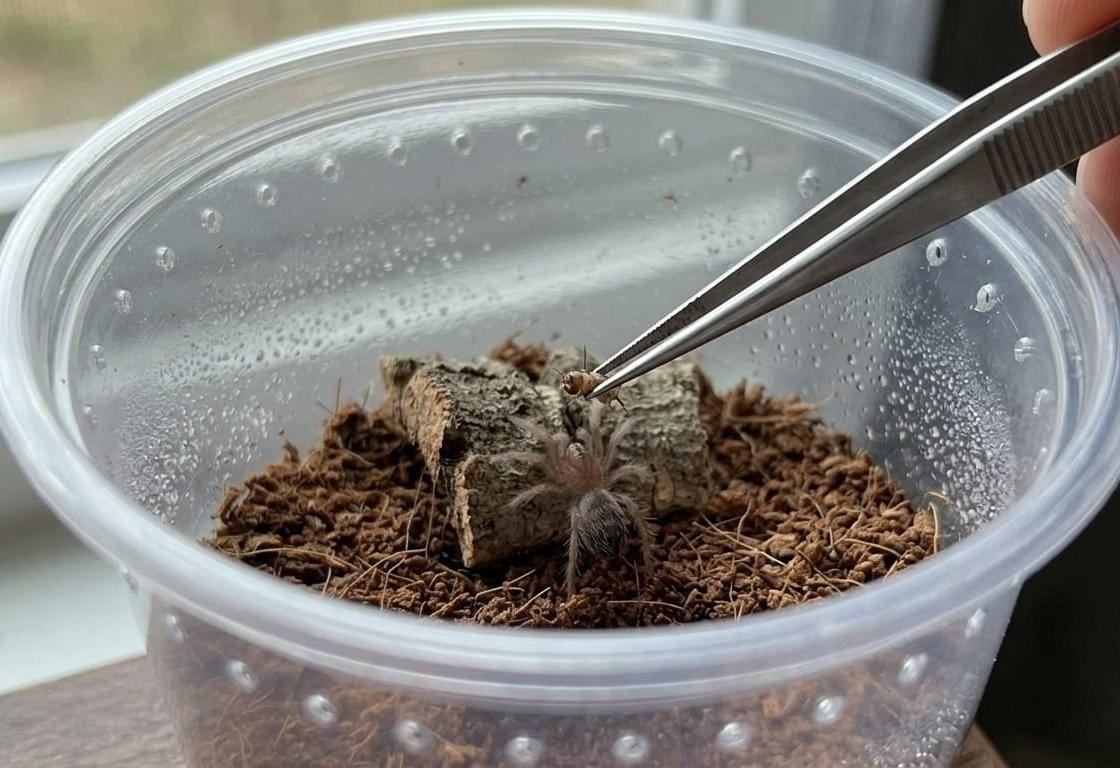
- Feeding tongs or a small paintbrush
These help you put the prey exactly where you want it, instead of just dropping it in and hoping for the best.
- A small catch cup
A catch cup is very helpful the first time your sling tries to escape. This is likely to happen at some point.
Once your sling is settled, feeding every 3-5 days works well for most species. You don’t need a strict schedule. If your sling’s abdomen looks plump, it doesn’t need to eat, and if it refuses food, that’s usually fine (see below for more details).
Always remove uneaten prey after 24 hours, because leaving live prey with a molting or uninterested sling can cause stress or injury.
What you don’t need yet for your tarantula sling setup
- Hygrometer
It’s useful later, but you don’t need one for a single sling in a small enclosure.
- Heating equipment
You don’t need it for most homes, since they’re usually warm enough. Many people think a tropical species needs extra heat, but that’s not usually true. A heat lamp or mat can be more dangerous than a slightly cool room, and small enclosures can overheat quickly if you’re not careful.
- Elaborate decor
Plants, moss, and extra hides can wait until your sling is bigger and you’re ready to have fun designing its enclosure.
Tarantula Sling Setup: The First Week
Don’t feed your sling right away. Let it settle into its new home for a couple of days first. After a stressful trip, a sling often refuses food anyway. Keep the room free of drafts, keep one side of the substrate lightly moist, and otherwise just leave it alone.
Honestly, this is the hardest part for new keepers, not because it’s tricky, but because you’ll want to check on your sling all the time. However, the first week is really about learning to give your baby tarantula space to settle, not to hover.
Is it dying, or is it molting?
Almost every new keeper asks this at some point, often while feeling a bit panicked. Here are a few signs it’s pre-molt rather than unwell:
- The abdomen looks noticeably dark or almost black. This is the new exoskeleton showing through.
- It stops eating and refuses prey entirely, sometimes for a couple of weeks
- It goes still, often flipped onto its back or tucked into its hide, and stays that way.
That stillness worries most people, but a tarantula on its back during a molt is acting normally. The best thing you can do is not offer food, poke at it, or move it. Just leave it alone until it’s clearly finished. Molting slings are very vulnerable, and even a well-meaning check can cause harm.
Quick troubleshooting
- Sling isn’t eating.
First, check if it’s about to molt (see above). If not, your baby tarantula might just not be hungry yet. Try again in a few days instead of offering food repeatedly. Only worry if it keeps refusing food for several weeks and its abdomen looks shrunken instead of plump.
- Sling isn’t moving much.
This is normal. Slings are ambush predators, not explorers. If your sling sits still in its hide for days, it’s acting just as it should, not being lazy or sick.
- Mold appearing on the substrate.
This usually means things are too wet, or there’s uneaten prey rotting in the enclosure. Remove the moldy area, reduce the moisture a bit, and always clear out uneaten prey within 24 hours.
- Sling escaped the enclosure.
Look in low, dark, and warm spots nearby, like behind furniture or under baseboards. Most escaped slings turn up within a day or two.
Quick shopping list for your tarantula sling setup:
- Small ventilated enclosure (2-4 oz / 60-120 ml)
- Coco fiber substrate
- Small hide
- Shallow water dish or bottle cap
- Appropriately sized prey
- Feeding tongs or paintbrush
- Small catch cup
That’s really the whole list. If a “sling starter kit” has more than eight items, someone is just adding extras you don’t need.
Frequently Asked Questions
- What’s the best tarantula sling setup for beginners?
Most ground-dwelling slings do best in a 2-4 oz (60-120 ml) ventilated enclosure that’s small compared to their body size, instead of the roomy setup you’d use for an adult.
- How often should you feed a tarantula sling?
Feeding every 3-5 days is a good rule once it’s settled in. If your sling’s abdomen is plump, it doesn’t need to eat, and if it’s about to molt, it will refuse food completely.
- Why is my tarantula sling not moving?
This is normal. Slings are ambush predators, not explorers, so sitting still in a hide for days isn’t a sign of illness.
- How do I know if my sling is molting instead of dying?
Look for a darkened abdomen, refusal to eat, and long periods of stillness, often on its back. Leave it alone until it’s clearly finished molting.
If you want more details on your tarantula sling setup Check out our [G. pulchripes sling care guide] for a deeper look at one of the most beginner-friendly options.